July 2011
| |
|
July 2011 |
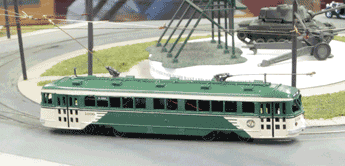
Improving the Peter Witt Trolley Models from Miniatures by Eric ! Earlier this year, Eric Courtney began development of HO scale Peter Witt Streetcar models from Brooklyn and Detroit. He decided to find ways to use the trucks from the Bachmann Peter Witt and couple them to a larger motor and flywheel. He made the models available to the Trolleyville Times for review. one East Penn Traction Club modeler, Richard Allman obtained both of them and decided to share his experiences. by Richard "Rich" Allman I recently acquired two of the Miniatures by Eric Peter Witt cars, models of prototypes that have been on my wish list for longer than I care to recall. I obtained the Detroit 3959-3980 model, with the imposing overhanging destination sign, characteristic of Detroit, and the Brooklyn 6000 car. This report is principally about the Brooklyn car. Both of these cars were Depression-era attempts to modernize huge systems and were the last attempt to do so before the PCCs appeared in the mid to late 1930s.
The trolley rope catcher is on the rear, centered under the roof line and above the center window. Reviewing photos reveals that about half of the 6000s and their closest kin, the 6100s, had the trolley rope catcher where Eric has placed it (Figure 2).
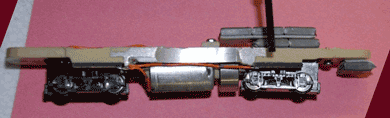
The others had the catcher located on the left side beneath the rear windows (See red arrows). I mention this because if one is compulsive about prototypic accuracy, some research will be needed to choose a correct car number with this feature. I have chosen to model car 6046, since I have a picture of the rear of this car with the pole catcher where Eric has placed it. The floor is attached to the body shell with screws through the floor into front and rear posts cast into the inside of the car roof. I found that the screws provided, while good for the front floor to post connection, were too short to reach the threads in the rear post. Three options were available-a longer screw, countersinking the screw hole on the rear of the floor, or cementing a 1/8 inch L shaped tab to the inside rear of the car, and having the floor rest on it. I chose the latter method (Figure 3), though any will work. The advantage to the method I chose is the ease of getting the floor off for working on the car. The front post was a tad shorter than the rear one; consequently, the car was lower in the front than in the rear. This was corrected by placing a three scale inch shim between the bottom of the front post and the floor, which leveled the car nicely. After attending to these details comes the next chore, getting the car running. With a floor and motor, having acquired the Bachmann Peter Witt trucks, which were back-ordered at Bachmann, one would surmise that getting the car operational would be easy, but not so fast! Eric has metal strips on the underside of the floor that contact the metal tabs on the trucks to pick up power from the rails. These strips need to be soldered together and a contact wire soldered to the negative terminal on the motor (Figure 4).
A wire was soldered to the underside of the pole bushing on the inside of the car roof. That wire was crimped near the rear post that should accept the mounting screw from the rear of the floor (issues with that already discussed!) The contact wire from the bushing is cemented to the post and crimped again at the floor (Figure 5).
It should have enough tension to swipe a brass tab cemented to the plastic part of floor (Figure 6).
From thence, a wire is soldered to the plus terminal of the motor. Now all the wheels are powered and connected to the negative terminal, and the pole is connected to the plus terminal. Testing with a power pack showed that the motor ran well with the plus wire in the pole bushing, and the negative wire attached to any of wheels. Accordingly, it seemed like it should be ready to run. Not-so-fast again! Now we needed to address an insufficient turning radius in the trucks. The first thing I did was to huddle with my great friend, Bob Dietrich, who devised and published a method to improve the turning radius in the Bachmann Peter Witts several years ago. This involves lengthening the U-joints in which the trucks are constrained to allow more swing in the trucks. This step is essential for satisfactory operation and turning, especially in ORR 2400/2403 turnouts. I have two such turnouts on my layout and one other reasonably sharp radius (maybe 7-1/2 inches) so this step was vital. It involves using a Dremel high-speed cutter tool, part 194, 1/8" 3.2mm, to slightly lengthen those U-joints (Figures 7 & 8 below). Omit this step and the car cannot operate. NOTE: The enlargement of the holes identified with the white arrows in Figures 7 & 8 is a step that must be done slowly and carefully. Cut too much and you may have ruined the floor and possibly the model.
With trial and error, Bob and I got the car so it would turn on almost all of my switches. As sometimes happens, one switch would make trouble; it was the facing switch of the one siding on my layout that uses the Orr switches. Solving this problem took the better part of an evening, but for now it seems to be good, or at least dependable. I added a series of weights over the front truck, and in the end needed to use around 1-1/2 to 2 ounces of lead (Figure 9).
This put enough downward pressure on the truck to keep it from climbing the frog of the turnout. Although the car is eight-wheel drive, I was fortunate that no similar problem emerged with the rear truck. The weight is visible in the car and I will need to put a fair number of people into the car to cover up the weights, but Brooklyn cars were crowd movers! The weight is not a stress on the motor, since it is large enough to pull a train. The universals groan a bit on the sharp curves. With the weight in place, the car easily climbs the 4% grades on my layout. Occasionally the car needed a tap on the body to get started - related to the contact of the truck tabs with the contact strips on the floor. Accordingly I dismantled the trucks and adjusted the contact tabs and by so doing, established better and consistent contact and eliminated the stalling (Figure 10).
Of note, because this is a relatively short car, a short pole seems to track best on the overhead. The motor is noisy, but strong. Next will come the painting and decal application. The HO Brooklyn set that Custom Traxx produces will suffice; it has the right logos for the final light green, cream and gray scheme I will apply, along with the requisite silver numerals and destination signs. A strip of styrene will be needed for the destination sign in the front side window just behind the front door. A fender is needed, which I have in my stash. Some things I wish had been thought out a bit more, specifically the turning radius and the attachment of the floor to the shell. Eric worked with what is available for power units for cars of this type and properly concluded that for all its limitations, the Bachmann-type drive was most suitable. With a lot of work, including grinding out of U-joints and adding weights, it can be made to go through some very tight radius curves, such as the 6 1/8" radius of the ORR 2400 and 2403 turnouts. (See Figure 11 below).
The model is very reasonably priced. Eric, as normally can be expected, was attentive to the accuracy of the casting. This is a model of a historically significant trolley that will be a nice addition to my fleet. Now to get the Detroit Witt running....more about that to come, along with pictures of the finished Brooklyn and Queens 6046. Next stop Borough Hall on the Flatbush line! ADDENDUM: After a long Memorial Day Holiday weekend of trial, error, grief, and final elation, the Detroit car was also made capable of negotiating ORR switches as well [Figure 12 below]. This car has a longer wheelbase so this compounded the problem of radius.
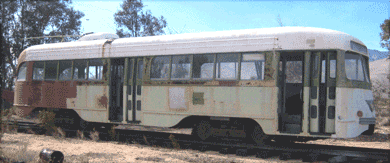
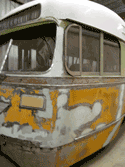
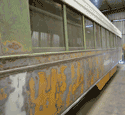
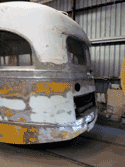
But there are some caveats. First, you must CAREFULLY grind out a little further all the U-joints on the floors, add 2-3 oz. of lead weights. Both Miniatures by Eric cars, after adding the headlight on the Brooklyn 6046, the trolley rope catcher on the Detroit model, the roof walks and fenders on both, are now operating and ready for the paint shop. Final products reports to follow! Los Angeles Railway PCC Survives (Very Well)!! In 1963, the late Jack Richer was so inspired by Walter Abbenseths streetcar acquisitions, that he had decided to buy one himself. MTA had closed the last streetcar operation in March, and most of the cars went to Chile or Egypt. A few made it to museums, including the 3001 (1937), 3100 (1943) and 3165 (1948), plus the body of 3084 (1937), all four of which came to the Orange Empire Railway Museum (OERM) in Perris, CA. The 3101 (1943) went to a museum in Colorado. Richer kept 3072 in operating condition, and under cover, at his dusty ranch in the Owens Valley, running it back and forth over a hundred feet of track, and powered by a lot of batteries. After Jack passed away in 1999, the car came into the custody of another family in the Owens Valley, who parked it in their back yard, to preserve it, but not being quite sure what to do with it. Now ten years later, it has been offered as a donation to OERM. The car is shown in the current condition below:
Despite being out of service for nearly 50 years, it is complete and in remarkably good condition, with little rust, all of its windows and interior intact, and with trucks with wheels that appear to have little time on them. LARY 3072 is part of the second order of PCC cars in 1938, and shares many of its parts in common with two of the other three PCCs. Today, this car is probably the last intact Los Angeles streetcar in existence outside of museums. It is likely that this could be OERMs last acquisition of an intact Los Angeles streetcar. This car and its components can provide a much needed backup to the existing well-used fleet already at OERM. Recent inquiries indicates that it will cost between $2,000 and $3,000 to bring the old car home to its final resting place, but recent developments where the car is presently located have made the acquisition in the near future urgent. as it may have to be moved very soon. [See 3072, column 2] |
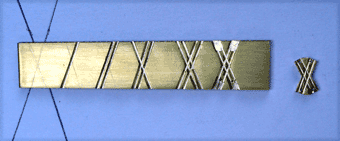
Custom Made Overhead Trolley Crossings ! by Larry Loyko, Richard Vible When a traction modeler starts hanging overhead wire, and gets the cars to run from a powered overhead, the first problem to be overcome is the proper location of overhead frogs for reliable operation. When you start to model city transit with those complicated intersections, the problem of a curved crossing normally arises. Trying to hang overhead wire over an ORR Right Curved or Left Curved crossing can really be frustrating. The Southern California Traction Club (SCTC) discovered these problems first hand when they could not get two way operation through the curved overhead crossing using the Rivers Traction & Trolley B-615 variable crossing. It was with great surprise and astonishment that we discovered the curved crossings made by Larry Loyko on the Vimooreko layout seen at the the East Penn Traction Club Meet in May 2011. We watched flawless operation both ways though the many curved crossings, so we asked Larry to show us exactly what he was doing. The following method o make trolley wire crossings to custom angles was submitted by both authors for your information. They are all hand-made and have been found to work almost 100% reliably, and can even be subject to back pole operation. PROCEDURE: 1. Onto a file card or other small piece of paper, draw the tangent lines of the intended trolley wire for both routes. Note the illustration at the end of this article. 2. Lay the paper atop the track work and draw the lines. Do not draw curved lines - Just the tangent of the curve where the two trolley wires are to cross. 3. Obtain 1/16" thick brass strip, 1/2" wide, from K&S - Special Shapes, available in most hobby shops. Lay the brass atop the paper with the cross lines. 4. Using a ruler, scribe the cross lines onto the brass so that the point of crossing is on the center of the brass strip's width. 5. Grooves for the trolley pole to follow are cut into the brass using a slotting file that is about 0.030" thick. Parallel grooves are cut on either side of each scribe line so that what remains between the two parallel grooves, is a rib of brass about as thick as the trolley wire being used. 6. Cut the first groove just to one side of a scribe line. HINT - Make a starter groove using a triangle file that has a SHARP, FINE set of corner edges. Once the starter groove is established, use the slotting file to finish cutting the groove. Cut about half way through the thickness of the brass. 7. Cut the second, paralleling groove on the other side of the scribe line. The "rib" that appears between the grooves should be about as thick as the trolley wire. 8. Cut the other two paralleling grooves along the other scribe line. Make one full groove first, and then cut the other to full depth. File the surface of the brass and dress up as necessary the grooves and ribs. The ribs should have a beveled or slightly rounded top edge on which the trolley pole is to ride. 9. Using a micro-burr in a motor tool, remove excess rib material from the four entry ways of the frog. 10. Drill a hole for the trolley wire at each end of the ribs that remain. Round off the sharp corner of the rib at each drill hole to prevent snagging of the trolley pole. The crossing frog is now cut free of the brass stock by using a jeweler's wire saw. Use fine files to dress up the crossing frog.
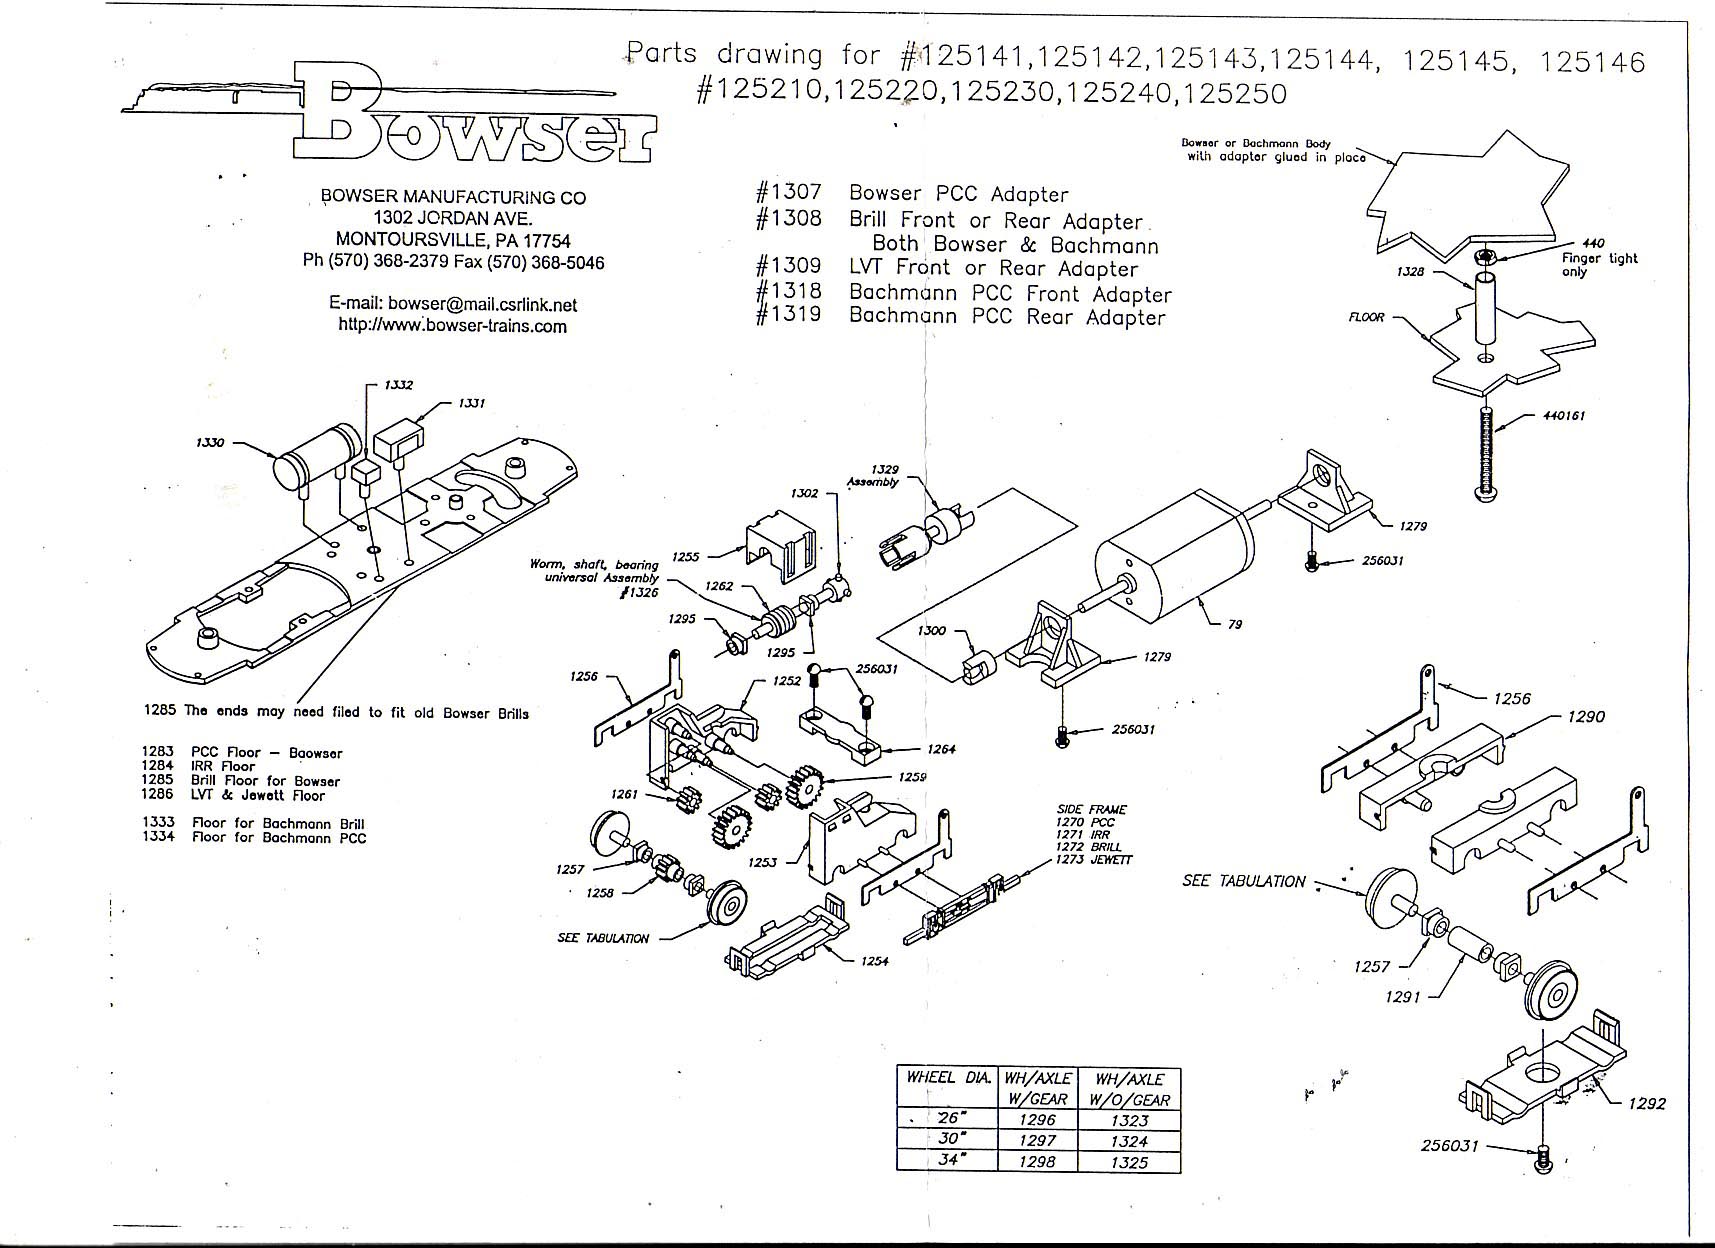
The idea is to try to make the finished frog as small and neat as possible. Yes, the frog is oversize, BUT the compromise is that it works reliably. Remember that the overhead wire fittings used are mostly O scale in the first place. The grooves cut by the slotting file have been found to work almost exactly with the NMRA recommended width dimension for trolley pole wheels and slider shoes. The SCTC has received a sample of one of the Loyko-fabricated crossings and will be trying it on one of their new modules. Mentoring New Traction Modelers! It is very hard to visit a traction meet such as the East Penn Traction Club Meet in May 2011 without noticing the aging of the average participant. There are pockets of younger modelers and they tend to be involved in the newer vehicles and smaller scales. But every once in a while, one of these modelers reveals himself in a letter or email to a traction manufacturer, a statement on a yahoo traction group or a direct contact at a model train show. Trolley Talk seems to have virtually disappeared and there is no certainty that it will resume publication so this is an excellent time for some of us to participate in a mentoring program. The diversity of venues (subway-elevated, interurban, city streetcar, light rail vehicles, main line electrification etc.) in which to do traction modeling makes it prudent to have direct contact with those who wish to enter or resume our wonderful hobby. We are asking all of you modelers out there to consider personal intervention when you come across one of these neophytes. Personal intervention can get these people aimed in the right direction and can give them a quick avenue to resolve problems or get them resolved. Recently a suggestion was made that seemed to eliminate vendors as mentors. Nothing could be further from the truth. However, no vendor in this hobby is making "gobs" of money. Some of them are on shoestring financial budgets so there is pressure on them to sell their products, whether or not their product is the ideal solution for the hobbyist in question. Professional vendors always mentor their customers as they well know that these people are their future customers. But, a knowledgeable modeler who used to be or currently are streetcar or subway operators, is a prime candidate for a mentor. At the June 11th meeting of the Southern California Traction Club, the club decided to form such a mentor program. so if you post on one of the traction groups asking for advise on how to enter or re-enter the hobby, do not be surprised if you get an email or a call from one of the club mentors. We hope that these private emails or phone calls may reap great rewards for the next generation of modelers. Bowser HO Traction Drive Improvements! The Bowser HO scale traction drive has been available now for almost twelve years and is powering many model trolley cars, subway cars and light rail vehicles. As costs increase in China, Bowser is faced with the same problem of reducing costs while maintaining quality. One of the few problems with the Bowser traction unit is the assembly of the wheels, axles and bearings. These are very problematic and must be installed in the correct manner or else the rear truck binds and forces the car to stall or the power truck binds and slows the car down. Lee English and the Bowser staff came up with a solution that eliminated separate bearings (part 1257) and combined the bearing with the power pick-up (part 1256). He began testing a unit and ran it 24 hours a day for 12 days continuous on their test track. No wear of the brass pick-up or the steel axle was noted. Then the unit was sent to Custom Traxx for testing. The unit was placed in the pre-production P&WCTCo / PSTCo Center Door interurban kit from Eric Courtney and run another 100+ hours to date. We have not seen any down-side yet.
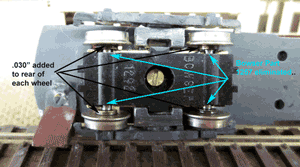
The trailing truck is shown in the next photo. The major changes are noted by the arrows. Coincident with this change will be an .030" collar added to the rear of each wheel. This change will first be applied to the 26" PCC wheels first in the 125141 (Old Bowser PCC) and 125142 (Bachmann PCC) mechanisms and unless negative results are found, then slowly proliferated throughout the other wheel sizes. None of this will be overnight. Current stocks will probably be exhausted prior to any such switch over.
The Muni "Torpedo" from IHP! On May 2nd, San Francisco Municipal Railway modelers originally appeared to have been given a present from Imperial Hobby Productions (IHP), when they announced on their yahoo group, 'hotractionmodeling', post 11312, that they would be offering an HO scale model of the San Francisco 1006-1015 series "Torpedo" double-end PCC streetcars. Since for some unexplained reason, the IHP internet site has been unavailable for some time, this announcement was only available to those who subscribe to that yahoo group. These ten PCC cars, built in 1948, will soon have the distinction of having eight of them preserved and operating, with seven in San Francisco and another preserved in a museum in Australia. By 2012, the seven remaining in San Francisco will be operating in the liveries of Dallas, Illinois Terminal, Market Street Railway, San Francisco Muni (green), San Francisco Muni (blue), and the Philadelphia Suburban Trans'n Co. so on the surface, one might think that this car would be an outstanding model to develop and produce. Nevertheless, the car was mentioned in the last issue of the Trolleyville Times in connection with the steadfast refusal of IHP to provide a sample Torpedo shell to Custom Traxx so they could finish a set of decals that were begun over two years ago for that car. We were told that the decal set was 85% complete at that time. Regardless, an equally surprising announcement was made on the same yahoo group on June 13th, post 11453, that "...IHP is discontinuing sales of the HO Scale SF Muni Torpedo double-end PCC, effective immediately..." Shortly thereafter, Custom Traxx officially cancelled their project to make decals for the same car. Sorry, HO scale San Francisco trolley modelers, it appears that some rather silly, almost infantile, behavior has cost your growing group what would have been a very desired model. However, for those of you still wishing a model of a 'Torpedo' and have not been able to obtain one of the brass models imported years ago, a method was developed for converting the IHP Illinois Terminal PCC to a San Francisco 'Torpedo'. If you are fortunate to be able to locate one of the IHP Illinois Terminal PCC shells and have interest, here is the complete procedure. Just click here. Custom Traxx has completed one such car and it was operating at the Orange Empire Railway Museum "Pacific Electric Days" celebration on June 18-19, 2011. With the sturdy Bowser 125100 drive, A-line 20040 flywheel, 125164 Custom Traxx metal floor, and a TCS M1T decoder, this car steals the show when operated. It has been equipped with operational headlights and taillights and runs smoothly and quietly.
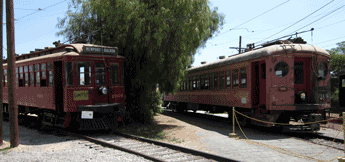
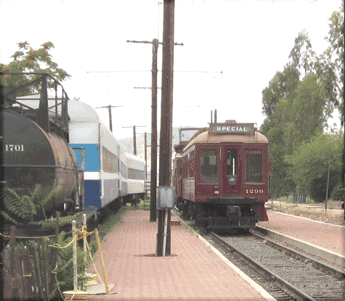
_________________________________________________ Pacific Electric Weekend at the Orange Empire Railway Museum! Every June during the Father's Day weekend, Orange Empire Railway Museum honors the Pacific Electric when all available former Pacific Electric rolling stock are brought out to show to the public.
Shown above are car 1001, the last surviving member of the once proud 1001-1044 class and 314, the last of the former Northwestern Pacific Interurbans. Both of these were brought out for rides for members only.
Shown above is the 1299, the steel officer's car that partially replaced the wooden bodied 1000, which is also at the same Museum. Elsewhere in the Museum, body work has been virtually completed on Los Angeles Transit 3100, one of the 30 PCC cars, series 3096-3125, delivered to Los Angeles in 1942/43. This car has been at the Museum clad in the last LATL "Fruit Salad" paint job applied in 1956 and will shortly be completely repainted. These cars were unique in that the center doors were moved one window toward the rear of the car, a feature found only on the Boston Pullman-built air-electric PCC cars and never repeated on any St. Louis-built air-electric PCC.
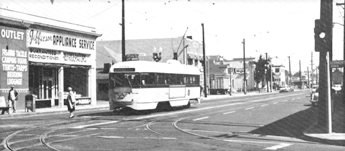
Meanwhile, just prior to this event the Board of Directors of OERM decided to form an 11 member committee to explore, evaluate and recommend methods of restructuring their executive structure, which was originally developed in the 1950s-1960s, to align with changing times. The new structure will probably require both additions and deletions at all levels. On that committee, the Board named Byron Brainard, Dave Garcia and George Huckaby. All three are involved with the Museum and also members of the Southern California Traction Club. Bowser HO scale "Souvenir" PCC Models! Bowser Manufacturing has made the decision to no longer make their "souvenir" (unpowered with plastic floor and wheelsets) "HO" PCC Car models available through their normal distibution channels. They do realize that there are traction modelers who prefer to have the souvenir models as part of a collection. To fill that gap, Bowser has named Transquip Company of Chalfont, Pennsylvania as the sole distributor of the souvenir models. To insure that the souvenir models remain unique from the powered and powered-with-sound models, these "souvenir" models will normally have different destination signs and car numbers from the powered units. The souvenir models will available from Transquip Company both at retail as well as on a wholesale basis to hobby stores and museum gift shops. This new distribution will begin with the five new PCC Car models scheduled to be available late in the Fourth Quarter of 2011. Should you have questions or wish to place an advance order, Transquip Company may be contacted Toll Free at (888) 542-7455 (Outside Pennsylvania), or from within Pennsylvania at (215) 822-8092. The same car 3072 is shown at the intersection of Jefferson & Vermont in 1963 just before the end of service.
The expense to bring the car is not great, but the benefits to the Museum could be greater. Donations for the transport are needed now, especially in the next few weeks. Please help. This may be it, the last one. Be part of history! OERM, |
|
Trolleyville
| Factory
| Trolleyville Times | School
| Library
| Clubhouse
| Downtown |
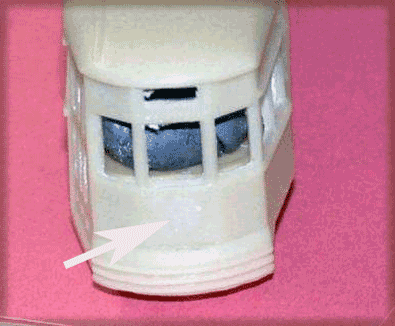
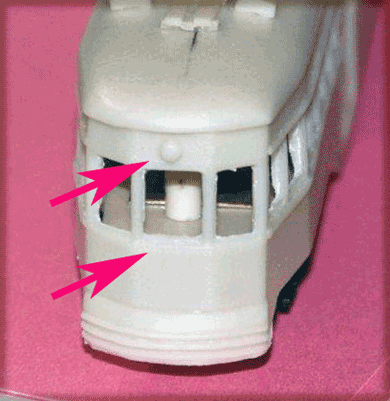 Figure 2 - Brooklyn 6000 Rear End.

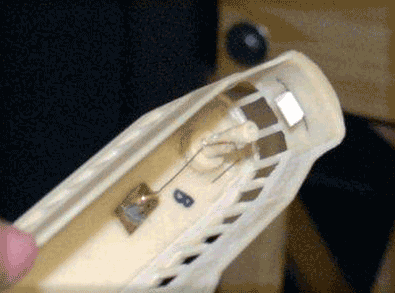 Figure 5 - Trolley Pole Contact Wire
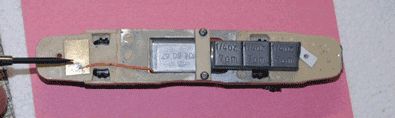
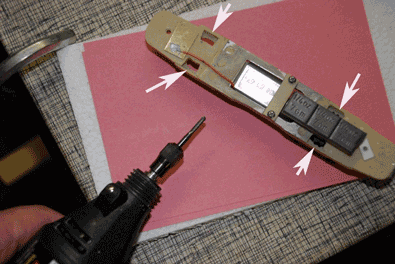 Figure 7 - Dremel Tool and Areas to be Enlarged.
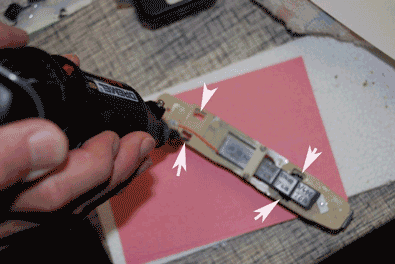 Figure 8 - Dremel Tool Routing One of the Four Areas.
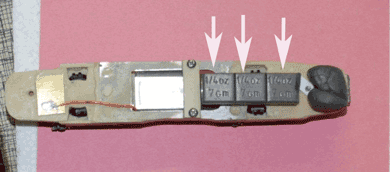
