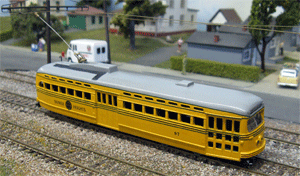
The Shaker Heights Pullman PCC, series 71-95, HO scale model!
The Brief History:
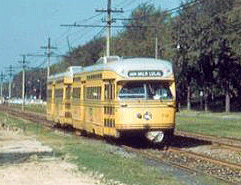
When William Van Aken was the mayor of Cleveland, Ohio in the early 1940’s, he visited Cincinnati and took a liking to their yellow paint scheme with the three green stripes. He specified a similar livery for the new Shaker Heights PCC cars. In October 1948, the first of the 25 PCCs from the Pullman-Standard Company arrived in the "bumble-bee" scheme, now replicated in San Francisco on MUNI car #1057. However, the Shaker Heights cars had some significant differences from other PCCs.
These 25 PCCs (series 71-95) were to be 9 feet wide and have an overall length of 50 feet, both dimensions being larger than a “standard” PCC. These cars also had a 301.5" truck center-to-center distance, which was 28.5" longer than the standard 273.0" on most PCCs. They also had a left-side door to allow for center-platform loading in the proposed downtown subway. The cars were also specified to have fully automatic couplers and multiple-unit (MU) capability.
However, the proposed subway was never built; concomitantly the left side doors were never used. In 1950, these 25 cars formed the base service along with five 300 Series cars and 31 older Center-Entrance cars. Subsequent to that, 10 PCCs were added from St. Louis (series 40-49), and 20 PCCs were obtained from Minneapolis (series 51-70) after Twin Cities Rapid Transit ended streetcar service in 1953. All cars except 51-55 were equipped for multiple unit operation and all of these “boomer” cars were built by the St. Louis Car Company.
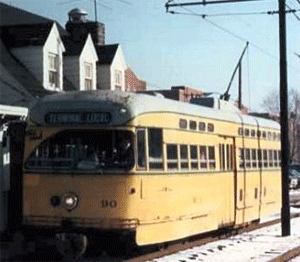
Two of the next photos show the Pullman-built cars in the original "Bumble Bee" three-stripe paint scheme, while the third photo shows a later simpler striping scheme. Before the PCC era came to a close, the Shaker Heights Line also saw cars from the Toronto Transit Commission and two from railway museums. These stripes eventually were reduced to two and then to one before other paint schemes were instituted. The 25 Shaker Heights cars remained in service until displaced by Breda LRVs in the 1980s.
.gif)
The Kit:
I obtained this kit from Imperial Hobby Productions (IHP) in May 2009 at the East Penn Traction Meet. The IHP kit provides seasoned trolley modelers with a very credible shell of the Shaker Heights series 71-95 PCC. However, like most kits, it does have a few “bugs” that need to be addressed.
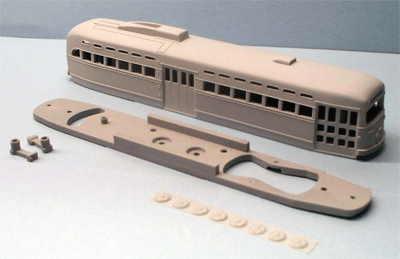
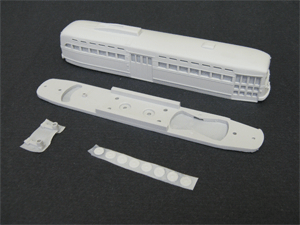
From the aesthetic point of view, my first concern is actually a just a pet peeve of mine. The photo (above left) is from IHP’s web site. While the photo shows all the windows and floor openings to be clear of material. However, in the kit I obtained, (as shown above right) the shell had thin flash covering all the front, side and rear windows. The floor also had flash present in its openings as well. Granted, the flash is easy to remove, but one must take extreme care while doing so, and it is a time-consuming process. In my opinion, it would be a good business practice to ensure the photos used to advertise the kit actually reflected the condition in which a consumer receives it.
Having said that, there are also a few detail issues present with this kit. The Shaker Heights PCCs had the single raised belt rail typical of a Pullman-Standard PCC, not the miniature version of the St. Louis Car Company belt rail that is present on the IHP kit. Hopefully, this may not be too noticeable when the green striping is applied. The rear trolley catcher had a ring around the entire unit that I have not seen on any known PCC trolley catcher. The two vents on the left side seem to be too pronounced and the trolley shroud is too narrow. The latter problem interfered with the swing of many trolley pole bases when installation was attempted. And on another personal preference, I would have liked to see a mat cast into the roof around the trolley pole shroud rather than a raised outline.
As this was the first kit I’ve obtained from IHP, I was curious to see if this was normal for an IHP kit. After doing some research, I discovered that the Southern California Traction Club (SCTC) has a membership with a good amount of experience with IHP products, and they were more than willing to assist with the review of this kit.
The members of SCTC that I spoke with shared my original assessment of the IHP kit. While these kits are clearly not intended for beginning modelers, we were in agreement that experienced modelers should be able to assemble and finish the model with excellent results. However, there was a sentiment expressed by some that IHP is "bucking" the current trend in the model railroad hobby by providing an incomplete kit, which was a source of concern amongst seasoned modelers.
For example, the Shaker Heights kit is designed to run with the Bowser mechanism but for some unknown reason, IHP no longer includes them with the kit. The kit contains no trolley poles, no trolley pole hooks, no operational couplers, and no decals are provided. There is also no reference to the color needed to paint the cars. Since there is no mention in the instructions where any of these materials can be obtained, it means that anybody wishing to complete and operate this kit must do a lot of leg work to source these items.
Nevertheless, it was the opinion of those who had previous experience with IHP kits that this manufacturer continues to increase the quality of its resin shells and the Shaker Heights PCC is no exception. For the most part, the detail is sharp and overall, the model gives the look and feel of the prototype. It also compares favorably with the drawing on page 76 of the 2009 book PCC Cars of the United States - A Book of Plans - Variations of an American Classic by Joseph S. Zen-Ruffinen.
The Assembly and Operation:
As I’ve stated before, this was the first kit I’ve worked with from IHP. As I discovered a plethora of useful information from the SCTC during my conversations with them, I also consulted their membership when it came time to assemble and run this car.
Also as previously stated, this is in an overall sense a very solid model kit, but my collaboration with SCTC during the assembly and test running of this car did reveal several issues of which modelers will need to be aware.
The first concern revolved around installing a drive into the kit. Although the resin floor fits perfectly into the shell, there were a few small problems installing the Bowser mechanism. Wisely, the manufacturer thinned the floor in the immediate area of the mounting screws for the Bowser motor mounts (part #1279). However, the screws provided with the Bowser 125100 mechanism were longer than anticipated by the manufacturer. This meant when they were inserted, the screws contacted the bottom of the motor causing the mounts not to lie flat on the floor. Adding two 2-56 washers between the screw and the floor corrected this problem.
After this correction, there was one other issue with mounting the Bowser drive to the floor. The mounting boss for the rear truck snapped off as soon as a screw was inserted, forcing the drilling of a new hole with a #50 drill, tapping it with a 2-56 tap and using a Bowser shouldered screw (part #65007) to secure the trailing truck. With the installation completed, the wheels appeared to be in the correct location after the plans for the car were examined. The A-line 20040 A-line Trolley Flywheel kit was added, as well as some Northwest Short Line nickel silver wheels. In preparation to run the car from overhead wire, SCTC’s normal printed circuit strips were also installed.
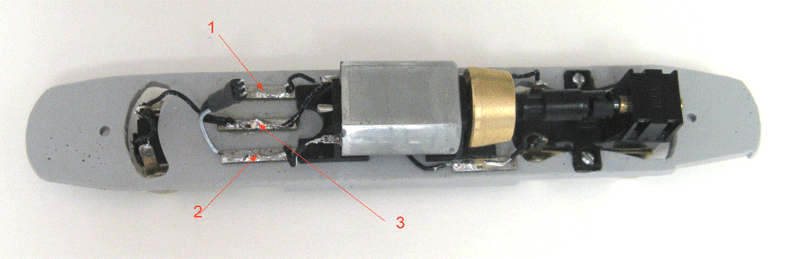
Arrow #1 points to the strip which is connected to one of the motor leads, and to the left wire of a Miniatronics 50-003-01 three-pin Micro-Mini connector. Arrow #2 designates the strip which will be connected to the grounded and to the center wire of the three-pin connector. The strip indicated by Arrow #3 is connected to the other motor lead and the right wire of the three-pin connector. Power is fed from these three strips through a Miniatronics 50-003-01 three-pin connector to the chassis and the DCC decoder. The female portion is normally connected to the shell and the male portion to the chassis.
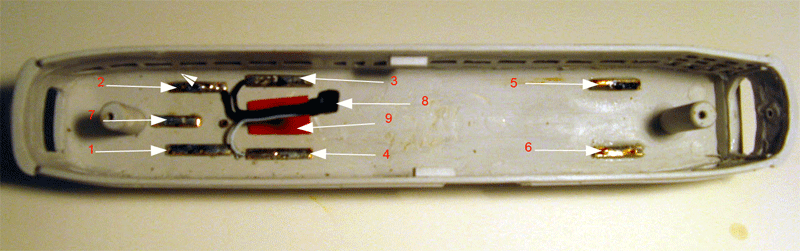
SCTC is currently installing DCC decoders to almost all of its newly acquired streetcars and interurbans. Their decoder of choice is the Train Control Systems M1 decoder with the Z2 decoder being a close second. They choose to use printed circuit strips strategically attached to the underside of the roof of traction vehicles as terminal strips for the connection of wires. These strips are originally either single sided PC board cut into 1/8" strips or Clover House printed circuit ties. These strips are then cut into approximately 1/2" long sections and placed them in the most appropriate places for installation of the decoder.
It is important to use flexible wire when wiring Bowser units, especially for the swiveling power and trailing trucks. SCTC has a “best practice” of saving the excess wire from the TCS decoder installations. This stranded wire is extremely flexible, thus SCTC has been using that wire extensively for wiring Bowser power chassis. Although two flathead machine screws are provided, the instructions provided by IHP do not specify the size of the screws or the required drill and tap to prepare the shell chassis mounts, so I drilled two holes in the two shell chassis mounts with a #50 drill, tapped the holes and used two 2-56 hex head screws to attach the chassis to the shell. I also used the same #50 drill to drill the hole in the roof for the SCTC1 pivot that will be used for the Miniatures by Eric HT-P2 trolley pole. Some brass was also used to fashion a trolley pole hook since none was provided with the kit.
NOTE: When installation of all electrical components in complete, including the headlight and the decoder, it is SCTC's normal practice to test any car equipped with a TCS decoder initially in the DC mode. If the headlight illuminates in what should be the forward mode and the motor runs in reverse, just reversing the three-pin plug corrects the situation without reversing connections. DCC instructions usually specify that the orange wire (from the decoder) is to be connected to the plus (+) terminal of the motor. The identity of the + terminal is not always obvious so errors are always possible. The same instructions specify connecting the red wire (from the decoder) to the right running rail in a two-rail operation. which has little meaning in the both-rails-grounded situation used with most overhead wire operation. When wiring trolleys for overhead operation, the red wire is connected to the rear trolley pole. Since they are currently in the transition stage between DC and DCC in overhead trolley operation, they continue to wire most trolleys so that they can operate in either arena.
Luckily, the floor provided by IHP in this kit offers enough flat space between the trucks to attach weight. To solve the weight problem, I used two CL-6 QuikTab QuickStik adhesive weights, obtained from Custom Traxx. These weights are intended for balancing wheels on trucks. They consist of six roughly one-ounce segments that are easily separated. SCTC usually uses two segments on any resin or plastic shelled PCC car, and the Shaker Heights car is no exception. After such an addition, the Shaker Heights car weighed 6.0 ounces. As of this writing, the testing was not yet complete to see if the amount of weight added was sufficient.

For this reason, it was decided not to install the well-detailed but thick wheel covers provided with the kit. I obtained the super resilient wheel decals available from Custom Traxx (set CT-995). A thin coat of Floquil Weathered Black was applied to the face of each wheel. After this was allowed to dry thoroughly, Testors' Glosscote was brushed on each wheel. Then the decals were applied.
The assembled Shaker Heights car, minus the decals and windows, was then run on a test track. It was test run under overhead wire in the DC mode using a Miniatures by Eric HT-P2 trolley pole. The unit would traverse 9" radius curves but not 6". However, the car still ran somewhat "slippery" and required more examination. First, I had to examine the trailing truck. As mentioned previously, a change had been made from the original Bowser brass wheels to NorthWest Short Line nickel silver wheels, which meant I had to handle part #1291 in the trailing truck. This is the plastic sleeve that holds the two half-axles together, and it is susceptible to warping and cracking when handled incorrectly. No problem was found with this part and all wheels were in gauge.
Second, I examined the upward pressure of the HT-P2 pole. Miniatures by Eric trolley poles are built with high spring pressure, as it is easier to decrease upward force than to increase it. I reduced the upward pressure, and added .5 ounces of weight directly over the power truck by fastening it to the underside of the roof. The improvement was dramatic but not quite up to standards. This means I may still need to find ways to add additional weight to the car.
Another problem was the fact that pole housing is too narrow, which caused the trolley pole base to contact the sides of the housing when swiveling on curves. This binding actually caused some derailments. To correct this, it was necessary to remove some material from the sides of the pole housing. A check of the plans shown in the Zen-Ruffinen book clearly show the entire pole housing on the model to be of insufficient width.
Two items remained to complete this kit. The first was to install the decals and then to install the windows provided. I had the Shaker Heights heralds and numbers provided by Paul Mayer; some Microscale 87-124-9* dark green striping plus some destination signs and a black PCC destination sign background from a Custom Traxx CT-995 PCC Dress-Up Kit. There are two Shaker Heights destinations provided in the CT-995 set, VAN AKEN LOCAL and SHAKER-GREEN RD. I started by placing the destination sign background into the recess provided on the model. It fit fairly well. After the decal had set and decal setting solution applied and dried, the VAN AKEN destination sign was applied. Then it was time to tackle the stripes. Because of the previously stated error in the belt rail, I applied the first of the three "bumble-bee" stripes right between the raised portions. The other two were installed directly below this stripe using the prototype pictures as a guide. There are two more stripes to be installed. One goes between the gray roof and the yellow car body above the standee windows the other goes in a straight line directly below the standee windows but above the doors until it meets the other stripe from the roof at the ends. It is this last stripe that gave me problems. I was told at on time by a well known decal maker that if there is any inaccuracy in a model that has not been caught up to this time, the process of decal application will showcase it. That was certainly true here. For some unknown reason, the kit has very pronounced sills over all three doors and the motorman's window exactly where this stripe was to be applied. This made the application of this stripe difficult. These sills do not appear on any prototype photo that I could find and I would recommend that they be removed prior to painting the car. After this ordeal was over, the application of the SHRT herald from Shoreline were a "piece of cake". I preferred the black numbers from Microscale set #87-94-2.*
*Note: Some of the Microscale numbers may have changed as these were old sets.
I started to follow the instructions provided by the manufacturer on how to install the windows. I first was going to touch up the mullions on the front windshield and rear window with silver paint when I noticed that most of the windows were full of air holes and they looked as if they were lightly sprayed with white paint. This is a similar problem experienced by a Trolleyville reporter with the Philadelphia Brilliner kit almost one year ago. After he complained to IHP, he got some replacements that were better but still had some air bubbles. So I just decided to test install the front windshield and rear window on my kit. I lightly sanded the edges until they fit snugly in their respective openings and affixed them temporarily with Woodland Scenics Accent Glue. These windows require a lot of careful handling but the front windshield and rear window look very good in place. These served as practice windows so maybe a couple of bad ones such as these should be provided in each kit to prevent messing up the good ones. I think I have the "hang" of installation of these flush fitting windows now so I plan to seek replacements.
The Summary:
All in all, the IHP Shaker Heights Pullman PCC is a reasonably solid model kit. With four improvements, it is my opinion that this could be a very good kit. First, correcting the pole housing issue in future castings would significantly reduce the amount of “tweaking” modelers will need to do in making this kit operational. Second, the kit could help solve the weight issue by using some type of "aftermarket" pewter or heavy metal floor. As this car has an increased length and wheelbase, it only increases the need for the car to be heavier, and some type of heavier floor would reduce the amount of weight that needs to be added, and would eliminate the challenges we found in finding places to add sufficient amounts of weight. Third, the sills over the doors and motorman's window should be drastically reduced or totally eliminated and, finally, there needs to be clearer windows devoid of air bubbles provided.
About the Author:
Jonathan Werner is a recent addition to the Trolleyville staff as a reporter and provided coverage of the 2009 East Penn Meet at Villanova University. Since Jonathan has lived in the central United States for many years, he has an interest in electric railways in the Midwest, especially PCC cars and light rail vehicles. He also has an interest in the “fallen flag” railroads from that part of the country, specifically the Great Northern Railway and the Soo Line. He is a second generation modeler.