KANSAS CITY PUBLIC SERVICE (KCPS) RESIN SHELLS |
||||||
by John McWhirter June 25, 2008 |
||||||
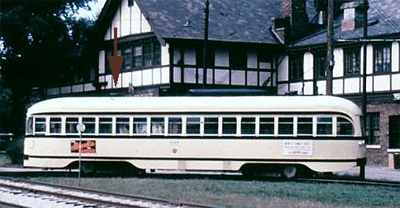
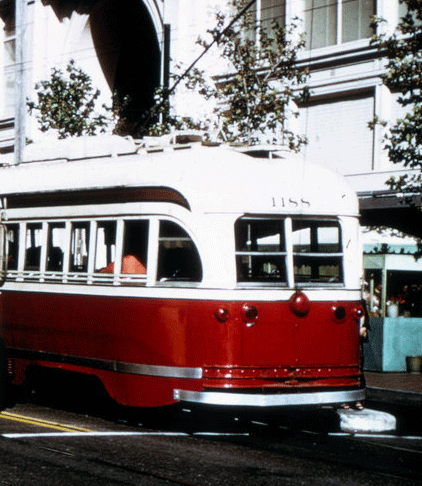
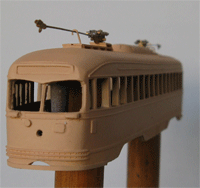
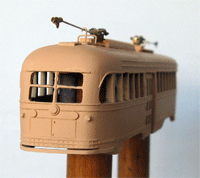
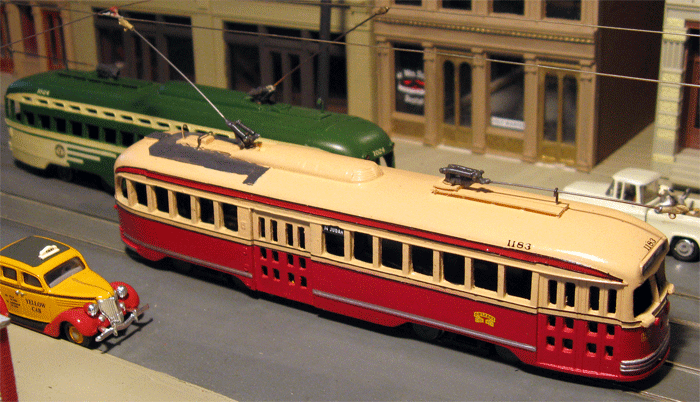
For the past two years, I have been increasingly involved in projects involving the San Francisco Municipal Railway (Muni). They are now using their second-generation Light Rail Vehicles along with half-century old PCC cars and even older conventional streetcars. During the construction of the Bay Area Rapid Transit in the 1970s, the Muni found that they needed nine more streetcars due to the extended running times around the construction area. So they obtained eleven streetcars from Toronto in 1974. These cars had originally been constructed for Kansas City Public Service in 1946 and 1947 and sold to Toronto in 1957. They had been in service for almost seventeen years when sold to San Francisco in 1974. The cars were renumbered 1180-1190. Nine of the cars were eventually modified for service. Two of the cars, 1184 and 1185, never made it. Only the bottom half of each car was painted (apparently right over the TTC maroon) in a Muni red then being used on some of the buses at the time; black numbers were applied on the over the TTC yellow-cream on the upper half of each car in four places; the Toronto "Next car" light on the front of the roof was removed, and front poles, roof walks and catchers were added. These cars did not see service very long as they were old and troublesome. The cars were shunned by operators and all were out of service by 1979. After hearing about these cars and seeing some of the photographs, I decided to build a model of one of them. I had discovered that there are resin body shells for ex-Kansas City PCC Cars occasionally available from a suburban Philadelphia firm but they were not available at that time. Then I saw the joint Custom Traxx/Miniatures by Eric KCPS body shell being tested and evaluated on the Southern California Traction Club test track and immediately put in a request for one. Shortly after obtaining this shell, the shells became available from the other firm and I obtained one of them also. So I had to decide which one to use as both of them had to be modified on one way or another. So a sort of review of the two body shells occurred during this process. I. Custom Traxx [TS-19] KCPS body shell I obtained one of the first batch of these shells from Custom Traxx. The shell, actually produced by Eric Courtney, appeared exactly as pictured on their web site. A cast brass lifeguard fender trip bar and some KCPS decals were also provided. There were detailed instructions included with the shells that told of the KCPS Air-Electric PCC cars and gave some painting hints. The shell is designed to mount on the Bowser 125141 mechanism. The Custom Traxx decal set, CN-750, had detailed instructions about the cars which would be helpful in the lettering of a KCPS car. The shell, almost completely devoid of flash and requiring practically no clean-up, is shown right out of the box below: |
||||||
  |
||||||
II. IHP [87127] Philadelphia ex-KCPS body shell I ordered one of these body shells as soon as they finally became available as announced on a traction chat site around the beginning of May. One month later, the shell arrived. This shell is also designed to be powered using the proven Bowser 125141 mechanism. I figured that I would only have to remove the Philadelphia unique gauge bars on the sides of the body shell in addition to the other modifications described above and I would be in business. |
||||||
  |
||||||
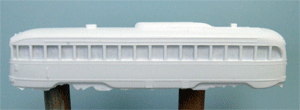
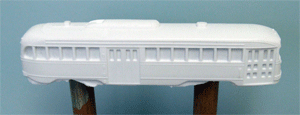
Because of the above photos published on the IHP web site, I was a little surprised when the shell arrived looking as shown below. I found no notice on the web site that such clean-up is required and the photos shown would not indicate to a buyer that such cleanup is necessary. |
||||||
  |
||||||
Considerable work would now be needed to remove the 'flash' from the windows, doors and the skirt areas. There were no instructions provided with this shell. It took a few hours of careful cutting with a sharp knife and sanding with a small file and sanding sticks to remove such flash. After finishing the removal of the flash, it became obvious that the gently curved pillars adjacent to some of the windows on the prototype were missing from the IHP 87127 shell, but they were represented on the TS-19 shell. The TS-19 body shell also had the dash lights which were in place on most of the cars when they arrived in San Francisco. San Francisco also removed the front ventilator when they installed the front trolley pole and this would have to be done on both shells.
Initially, I had a personal issue with the headlight wings being cast on the TS-19 shell, as I felt they would look bulky but I will reserve comment until after one of the body shells is painted in a scheme needing PCC headlight wings. They would have to be removed for this car if we were using the TS-19 shell. Toronto removed the headlight wings when the cars arrived there. All of these comments were passed to Custom Traxx, who received all comments in a professional, positive manner. They said that they would discuss each of my comments with Eric and that any proven deficiencies would be corrected in subsequent castings. Both TS-19 and IHP 87127 shells have identical dimensions, although the TS-19 seems to have front and rear contour closer to the the Bowser PCC shell. |
||||||
Both body shells would have to have a front trolley pole, roof boards, and trolley catcher installed. Both shells would have to have the "blinker doors replaced with folding doors as was done in Toronto. And the center doors needed to have the lower eight windows. I began to think that it might have been easier to use the TS-19 shell and remove the headlight wings and the front roof vents, but considering all modifications required and the effort expended to date, the IHP 87127 shell still seemed to be the better choice for the Muni model.
III. Modifying the IHP [87127] ex-KCPS shell: Step 1 - The gauge bars unique to Philadelphia were removed. These are located under the first window behind the front door on the left side and under the and under the second window behind the operator's window on the right side. Only Philadelphia (PTC) PCC cars has these and they added them to their forty ex-Kansas City Cars when they obtained them as the original cars lacked them. Step 2 - The KCPS type center doors must be replaced. Toronto initially replaced all the blinker doors with the traditional folding doors with all eight windows, four large and eight small. Later they simplified some of the doors with only two large window in each leaf. Note the rear set of front doors in the above photo of the 1190. To get a set of center doors, I contacted Custom Traxx and persuaded them to part with a set of PCC doors. I then carefully cut out the existing center doors in the body shell and cemented the new doors in place using ACC. I did not have to fabricate the unique Toronto chrome exterior center door stanchion as Muni removed them when they prepared the cars for service. Step 3 - Next was the fabrication of the trolley boards and trolley pole base mount. I removed the front ventilator as Muni obviously did when installing the front trolley pole and sanded the roof smooth. There are five crosswise supports for the trolley boards as you can see from the above photo of Muni 1190. They are mounted on the main body supports which line up with the pillars between the first four windows. For the supports, I used Evergreen Strip Styrene #131 (.030" x .030") and cut five pieces, each 2 scale feet long, scribed a center line along the roof and cemented them in place with one scale foot on ether side of the line. For the trolley boards, I used two pieces of Evergreen StripStyrene #8210 (.022" x .112") cut to 9.5 ft lengths. I then used Plastic Weld Cement to secure the boards to the supports. Both the front trolley base and the rear (Toronto unique) trolley board addition was made for the same two materials and located as shown in the above photo. It was then I noticed the lack of trolley board details at the rear of the IHP 87127 shell, so I added them using the same styrene, cutting then to fit around the rear ventilator. Both sets of teardrop shaped lights were removed from the from the front and rear of the roof. Step 4 - A front trolley catcher was simulated using an old catcher casting turned down to the correct size. Step 5 - Pole hooks and the rear ventilator pole guard were fashioned from brass wire. Step 6 - Using a #48 drill, holes were drilled at the correct front and rear locations for the trolley poles and SCTC1 pivots were installed and affixed with ACC. Eventually two HT-P2 trolley poles from Miniatures by Eric were installed.
Step 7 - Two holes were drilled with a #60 drill and small styrene tubing was inserted in the holes with about 1/16" protruding from the car. The ends were then cut and shaped to replicate these lights. Step 8 - Using #8204 Evergreen StripStyrene, the bumpers were fabricated and affixed to the car body with ACC. Step 9 - The front dash lights were simulated with small pieces of styrene, using the TS-19 body shell as a template. Although one was missing from the 1190, the other eight cars placed in service (1180-1183 and 1186-1189) all had them. Also , The operators front air vent was also fabricated using a cut rectangular piece of thin styrene and affixed to the dasher with ACC. Painting started with the airbrushing of the shell interior with Floquil 17 (Weathered Black). After masking off the interior of all windows and other openings, the complete exterior of the shell was airbrushed with PollyScale 414302 (Sand). At this point, after an initial coat of PollyScale 414302 (Sand), the modified body shell looked as shown below:
The body shell was then masked for application of TTC red to the lower half of the car and the letterboard area. The body shell was lettered with portions of Custom Traxx decal sets CN-4300 (Toronto PCC) and CN-1040 (San Francisco PCC) and the unique "cable car" Muni emblems from Custom Traxx. The IHP 87127 body shell is intended to be powered with the Bowser 125141 mechanism with floor and the shell has the mounting posts in the correct position, however, no holes were drilled in these posts. Both the drilling of the holes and providing the appropriate mounting screws were left to the modeler. An 125141 mechanism was assembled from spare parts obtained from Custom Traxx and NWSL 2637-6 26" nickel silver wheels were substituted for the stock Bowser wheels. Another problem surfaced with the IHP 87127 shell when mated to the Bowser 125141. This shell uses vertical posts at the Bowser mounting locations. They seemed to be too short as the car had a definite "low rider" appearance. The bottom of the doors are supposed to be 12 scale inches over the railhead. In this case it was only 6 inches. I had to add a few 2-56 washers to the posts and longer 2-56 screws. I would have preferred the same mounting method used with the cast Bowser shell and the MTS resin body shell of the Boston "Picture Window" PCC. The spacers provided with the Bowser unit permit easier adjustment of the body height. Now that this conversion is over, I've concluded that the IHP 87127 shell is best suited to represent the Philadelphia ex-KCPS cars, as is it's intended purpose. The TS-19 shell from Custom Traxx is more suitable for conversions to the Muni and Toronto ex-KCPS cars. One last point! Since as a member of the Southern California Traction Club, we are interested in the best operational performance. We always add the A-line 20040 Flywheel Kit to any Bowser 1999 traction mechanism. This car would be no exception. In addition to the performance improvements, the flywheel adds needed weight to the unit. The Bowser traction mechanism was designed with the weight of the Bowser metal shells in mind. The resin body shells are much lighter in weight. We have been using weights obtained for some time from Allied Model Trains in Culver City, California for some time now. These one ounce weights are part CL-6, Quik Tab QuikStik adhesive automotive truck wheel weights. They come in strips of six with self-adhesive backing. We use two of them under the floor between the trucks as shown in the next photo of any 125141 or 125142 Bowser mechanism. There may been a little filing necessary along on the edges to clear the skirts and center doors but otherwise they fit fine. If they hang a little below the skirt, they can replicate the pan under the motor-generator set. But once painted with Weathered Black, they will be almost invisible.
After the weights were painted and the finished shell was placed on the chassis, the nearly completed car was shown below on one of the Southern California Traction Club modules under development.
It was originally planned to have this car operational for a mid-June showing at the Orange Empire Railway Museum but the unexpected clean up of the IHP 87127 body shell took more time than was planned. The completed car will be running on the modules of the Southern California Traction Club at this month's 2008 National Train Show in Anaheim, CA. Hope to see you there! |
