January 2011
| |
|
January 2011 |
The Trolleyville Times wishes all readers the absolute best in 2011! |
|
Upgrading the Bowser 'Souvenir' PCC to a Powered Model! Since early November 2010, models of all fourteen of the 1050-1063 series PCCs that opened San Francisco's heritage trolley line, F-Market, have been available in HO scale from Bowser as powered models in the 12549-12563 series, capable of both two-rail and overhead wire operation. However, all of the models were available in limited numbers as 'souvenir' models in the 12750-12763 series. These models were available in selected museum stores such as the San Francisco Railway Museum and the Orange Empire Railway Museum Reception Center. These units have the same body shell, window glass and markings of the powered model but had plastic wheels and a plastic floor. Now available from Custom Traxx is a complete power chassis, #12548, that replaces the plastic floor and converts the souvenir unit into essentially a complete powered unit. To install this, the modeler should: 1. Remove the plastic floor, * Optional steps.
Procedure: 1. Removing the floor from the shell is a very simple procedure. Spread the four clear plastic tabs away from the floor and gently pull the floor from the shell. Do not be surprised if the truck wheel covers dislodge themselves from the floor in the process. They are just pressed in. Note 1: There is a perfectly good metal fender trip bar in the front of the souvenir plastic floor. You may want to remove this and keep it for later use. This is avery useful and scarce part for a streetcar modeler. 2. Preparing the chassis essentially prepares the vehicle for overhead operation. If that is not intended, skip this step. Three actions are involved: a. Adding sufficient weight to counteract the drag of the trolley pole. We have been using one ounce truck tire weights for this task. Holes are drilled in the weights to clear the two motor mounts screws and affixed with double-sided tape. One weight has been cut to fit. Although, 1.0 ounce was recommended by the East Penn Traction Club (EPTC) when they tested the units in 2008, we add about 1.6 to 1.8 ounces to our units as shown in Figure 2 below.
b. To ensure that the trolley poles make electrical contact with the circuit board, two U-shaped pieces of .019" brass is shaped and soldered to the electrical pads under the trolley poles as shown in the Figure 3. When using the Bowser 1250 trolley pole, the Bowser 12600* pole or the MBE HT-P2 pole with the trolley roof pole pivot bushings, part SCTC1/12509*, either item will pass through the holes denoted by arrows in Figure 3. Note 2: The Bowser 12600 pole assembly with the 12509 bushing is not yet available. It will be standard equipment on the new "single trolley pole" PCC cars due early 2011. The 12600 pole with bushing will be then available from both Bowser and Custom Traxx.
3. This modification is needed only if the modeler plans to use the Bowser 1250 trolley pole. The holes in the body shell were designed for the 2.0 mm (.0787") trolley pole pivot used with the Miniatures by Eric (MBE) HT-P2/Bowser 12600 trolley pole. To use the #1250 trolley pole with its 3/32" base (2.38 mm), the hole needs to be filed out just a little. So remove the Delrin trolley poles supplied with the shell and file out the holes a little at a time as shown in Figure 4 below until the Bowser poles snugly passes through the roof as shown in Figure 5. Note 3: File very slowly and keep testing the pole base until there is a snug fit. The threads of the base are a little larger than the upper portion without the threads and it is best that this upper portion fit as snug as possible to avoid wobble in the base.
Note 4: After this filing is complete, it will not be easy to use the SCTC1/Bowser 12509 pivot for the Miniatures by Eric/ Bowser trolley pole as the hole in the roof may be too large. Cementing the pivot into the shell could make reassembly of the shell difficult is not impossible after the shell is removed.
Then place two small drops of plastic compatible lubricant on the pole base and slide the pole base into the roof. We used Hob-E-Lube HL662 Lite Oil. The pole should swivel without any hindrance at all. We had been using the MBE pole almost exclusively for the past year so this time we decided to use the Bowser 1250 pole for our conversion of the Kansas City 12756 souvenir model into a 12556 powered car. In figure 5, the Bowser poles are shown already installed. The Delrin poles are shown after removal. Note that there is a spring, nut, washer and 1251 insulator shown in Figure 5 that is provided in each Bowser 1250 trolley pole package. These poles were originally intended for the older Bowser metal bodied cars (PCC 125210, Brill 125220, IRR 125230 and Jewett 125240). You will not need any of these parts. Keep them for other uses. 4. DCC with the F-line cars is even more fun if you are using the Train Control Systems (TCS) M4T decoder, a result of collaboration between John Forsythe of TCS and George Huckaby of Custom Traxx. Simply remove the NMRA plug and plug in the M4T, taking care that the decoder wires point away from the motor. Readdress the decoder to the desired new address, in this case 1056, and change CV 61 from 9 to 137. This last step activates the taillights unique to the Muni F-line PCC cars. 5. Installing the trolley poles will become much easier if you bevel the base of the screw base to ease the insertion of the base into the contacts after the shell has been installed. The poles can not be installed until after the shell is replaced on the chassis. It can be almost impossible to insert the poles after the shell has been installed unless this is done. See Figure 6 below.
6. Turn the shell upside down on a soft padded surface, being careful not to break the trolley pole hooks and insert the chassis until the four clear plastic tabs lock around the floor. After this is done, then the trolley poles can be inserted into the roof until the base is flush with the trolley roof boards. You are now ready to run. The F-line streetcar models came with improved nickel silver wheels but with no detail. So we have traditionally, lightly sanded the wheels and painted the faces with Floquil 100013 Grimy Black. After that was thoroughly dry, we painted the same surfaces with Floquil Glosscote. When this too was thoroughly dry, we applied the Super Resilient Wheel decals from the Custom Traxx CT-995 decal set. Finally, we brushed on some Walthers Solvaset or Microscale Decal Set and once this was dry, our car would normally be ready for service. Our finished car, San Francisco Municipal Railway 1056, ex-Philadelphia 2113, dressed in Kansas City Public Service colors, is shown in Figure 7 along with some of the Bowser pre-production PCC cars that were operated at the Pomona-Fairplex Great Train Expo (Pomona, California) on December 18-19 and will probably be operated again at the Anaheim Great Train Expo (Anaheim, California) on January 22-23, 2011.
Shown in Figure 7, along with San Francisco 1056 in Kansas City colors, are pre-production models of SEPTA "Gulf Oil" 2168, Toronto 4336 and LAMTA 3165 all undergoing extensive testing at the Southern California Traction Club test track. Expect production models of these cars at your dealers in early 2011. Re-Runs! ... Anyone Interested?
*** In a recent interview with Lee English, CEO of Bowser Manufacturing, we were told that Bowser was considering reruns of some of the more popular San Francisco F-line PCCs (i.e. 1050, 1059) along with the Baldwin VO-1000 diesel switcher in the Pacific Electric and Southern Pacific road names, both equipped with trolley poles. Also being considered is a release of a model of San Francisco 1058 in the original Chicago Mercury Green, Swamp Holly Orange and Corydon Cream scheme. The prototype car is being refinished in that paint scheme at the present time. Shown in the next photo is the car as it was evolving at the Muni Maintenance facility last month. It is expected back on the street during 2011.
Car 1058 was Philadelphia 2124 from 1948 until 1992 when sold to San Francisco. The next photo shows car 2124 in 1957 on Route 6 Willow Grove:
By 1973, the next photo shows that the SEPTA neglect was already beginning in the missing route number portion of the destination sign.
Of course, this car would not be with us today, if it had not been one of the 110 chosen for upgrade and rewiring in the 1980's. The car is shown in the 1980s on route 56, Erie - Torresdale, which lasted until 1992.
Bowser is also considering releasing an HO scale model of Pacific Electric Baldwin AS-616 5241 which was also equipped with trolley poles for a time.
If any reader has any desire for these items, this is the time to contact Bowser or Custom Traxx. The Team listens to your inputs so they are NOT wasted. So let your desires be known. [....or forever hold your peace!....]. The Bachmann
HO scale Birney......Nice! *** Custom Traxx received their first sample of the new Bachmann Birney on December 20, 2010, just in time for a review that could be completed for this issue. The car comes packaged in the same bright red box as we have become accustomed to with Spectrum products.
Our model was SKU 80201, the Philadelphia Transportation Company (PTC) #2, signed for Route 62. Birneys lasted on this route until 1948. First replaced with Nearside cars and then with modernized 8000 series cars, the very short route lasted into the SEPTA age with PCC cars until absorbed into Route 13, which still operates with Kawasaki LRT cars, now themselves almost 30 years old. We immediately removed our car from the box, weighed it and placed it on our test track. Our car weighed 3.2 ounces. We feel that this may be light for overhead wire operation but that remains to be seen. There is a lot to like about this car and a few irritants for anyone knowledgeable about Birney cars, but, as we are all finding out, injection model models will have same great features and a few irks.
Examining Figure 1, it is obvious to any Philadelphia trolley modeler that Bachmann made the same error that the Corgi people did with their O scale PTC Birney. The color used for the cream trim is much too dark and far too yellow. We can live with the green, however. The brown door and window trim could have used a little more red in the mix but the model sure looks like one of the last 5 Birney cars used in Philadelphia. The car has the correct dash numbers and destination signs. Trolley companies used all the available space in a destination sign box. The words YEADON and DARBY should fill the total available space. How can we convince manufacturers that the entire area of a streetcar destination sign is normally used. This would not have cost anything to do. It just is another example of how modelers could assist manufacturers if they were able to talk to each other at the right times. Compare photos of the model and the prototype as shown in figures 2 and 3 below:
Custom Traxx has a decal set, CT-6000 which contains destination signs and dash signs for Philadelphia Birney Cars. Destination signs of Birney Cars are typically 6" high by 27" wide. While the Bachmann car has the correct overall dimensions, they chose to make the actual height of the sign (the black area) of the destination sign less than the prototypical 6 inches. We first coat the specific area for decal application with Testor's Glosscote. After this dries thoroughly, we applied the necessary black background black decals, carefully cut to fit and applied a decal setting solution. Then we applied both the replacement YEADON and DARBY destination signs from that decal set. Philadelphia trolley modelers could easily change the destinations and dash signs for this car for routes 14, 38A, 59, 62, 71, 72, 74, 76, 77, or 78 as the set contained both dash signs and destination signs for those routes. We used both the destination signs and the dash signs provided in that decal set as we felt that the font used on the provided dash signs was of a font much too modern for a 1940s streetcar. Refer to figure 1. Bachmann's attempt at a block/run number under the destination sign is a nice touch but the number should have been 62-X, with X being the block/run number assigned (i.e. 62-6). Talking with persons knowledgeable on Philadelphia Birney cars would have been helpful here. If a manufacturer is going to the trouble of making a detail, the correct detail would be nice. Again an open dialogue with knowledgeable modelers would have helped here. Our model sat at the right height above the rails with the folding step being about 12 to 15" above the rail head. The trolley poles were much too long and combined with the drastically oversize yokes seriously detracted from the look of the model. The four-spring base provided by Bachmann is not representative of any known present or past trolley pole base. The design of the Bachmann Birney trolley poles does not allow sufficient spring pressure to hold the poles under the pole hooks. The trolley pole hooks are also too low. When placed under the hooks the poles are less than horizontal. The size of the pole hooks did not allow for the height of the platform upon which the trolley poles are mounted. Because of the design and the trolley pole hooks that are too short, the trolley poles end up just resting on the roof top, looking like the springs were broken. See Figure 4 below:
So for many reasons, including the fact that the poles are secured to the roof from the underside by screws, these trolley poles will have to be replaced by most overhead wire users. The model features an overhead/two-rail switch easily accessible under one of the platforms but we elected initially to test and program the car in the two-rail mode. We hooked up the car to our MacBook, PR3 and used DecoderPro to change the address to 2 and read out all the CVs. This decoder is not advertised as having a lot of capabilities, but to their credit, Bachmann has done much to introduce the general public to the concept of Digital Command Control (DCC). They provided a very simple entry level system for the entry level model train lover. They also have marketed HO scale model train sets with DC power packs and locomotives already equipped with decoders. On the other hand, they provide little data on their 'On-Board" decoders. The following is provided in the literature provided with our Birney: "...This locomotive is equipped with a 28-speed step decoder that is factory-programmed to address button 3 on NMRA-compliant DCC systems. To assign a new address or to program relative directional travel (forward and reverse operation), follow your control system manufacturer's programming instructions. Bachmann's DCC On-Board offers total lighting control, with constant directional lighting (if applicable) and a dimming function. The on-off lighting feature is factory-programmed to function button 10 (F10) on the E-Z Command system and other NMRA-compliant DCC systems. Directional lightingis determined by how you program your locomotive to recognize forward and reverse. The dimming function is factory programmed at function button 1 (F1) on the E-Z Command system and other NMRA-compliant DCC systems. When the dimming function is activated, locomotive lighting is reduced in intensity by half..." Next came the first testing in the two-rail mode. The car correctly responded to address 2 as expected. The lights came on with button 10/0 and all lights dimmed with button 1.[See Birney, column 2] A Word to Some Traction "Chat" Group Participants! Since 2007, there has been a dramatic increase in the interest of model railroad manufacturers in pursuing electric railway models. The Bachmann Peter Witt arrived in late 2007; Bowser and Con-Cor followed with their first PCC cars shortly thereafter. Bachmann is making their Peter Witt in O scale and has announced it in N scale. Their previously announced HO scale Birney Safety Car has just arrived and is being reviewed by Model Railroad News. The Southern California Traction Club has obtained one for thorough evaluation. Bowser is planning its next round of PCC cars for release in 2011 and is considering a conventional streetcar and possibly an N scale vehicle. We have not heard from Athearn and Walthers....yet! This is quite a difference from just five years ago. Almost all of these manufacturers or their representatives read the traction related chat rooms, especially the yahoo groups. Many of these manufacturers would seek support, information and prototype level information from traction modelers and the leading clubs. So they might go first to these groups, unless they have seen some of the negative activity that takes place occasionally. Considering that these manufacturers have payroll and other financial obligations, making a streetcar model must prove to be a profitable venture. Trying to find trolley models with sufficient nationwide appeal to justify a 1,000 unit production run is not an easy task since, except for Birneys and PCC cars there was so little commonality in equipment used by operators. These manufacturers will depend on inputs from modelers to make these decisions. So when any negative or unwelcoming response is posted to these groups, it can have a dramatic effect on a manufacturer that is considering a trolley model. It really is in our interest to encourage these manufacturers to talk to us. Elsewhere in this edition is a report on the Bachmann Birney. There are several areas where some input or consultation with any knowledgeable traction modeler could have corrected the problem at no cost. If only we could get that line of communication going. Having been on both sides of that aisle, we know what and who some of those obstacles are. Another disturbing habit of some posters is to take "pot shots" at traction products, publications or modelers for some perceived error or transgression. When the comments are erroneous or there is a good reason for the issue, many manufacturers will attempt to contact the individual in private (off-line). Many times the individual will not even have the courtesy to respond. Even if it is not apparent to the modeler, manufacturers spend considerable effort in bringing a product to market, especially when getting the product made overseas. Manufacturers get annoyed when someone attacks their efforts from "behind the rocks" and then does not allow a two-way discussion of the issue(s). Unfortunately, we are already aware of one manufacturer that actually loathes modelers and railfans. We really do not want what is a very small group to grow. On the other hand, it takes very little to no effort to get a model as correct as possible, if the information is at the manufacturer and available to the correct employee at the exact time when it is needed. To do this, we must have good relations with all of these people and behavior such as described in this paragraph does NOT help the situation. Last month, the Trolleyville Times received another disturbing phone call from a modeler, who had posted a method that he used to fabricate and install line poles. During that very long call, he related that because he felt that he was attacked for his idea, he would never share his ideas on that yahoo group again. This is not the first time that we have been told this. We cannot understand why a modeler who talks about Method/Model A being his preference has to be derided by a proponent of Method/Model B, Why does the proponent of Method/Model B feel is necessary to attempt to ruin the hobby for the proponent of Method/Model A and possibly the other readers of that post. This is not the first phone call or email that we have received on this subject. So we thought is was time to bring it to the attention of our readers. In a much more bizarre event, a recent request for assistance was made on a yahoo group by a manufacturer. The manufacturer was requesting help with or input to one of his proposed traction projects. The company did get a few responses. But one particular respondent was not met with a "Thank You", or a "No, Thanks" but, surprisingly, with a warning and veiled threats. Remember, the manufacturer asked for the input and a respondent was attacked for just responding. Anything posted on the internet takes on a life of its own and sometimes can come back to haunt the person or entity posting such messages. Negative and unfriendly type behaviors, such as those previously mentioned, are hardly positive for the hobby or those who are becoming 'miscreants' themselves. Again, be advised that almost all of the major model railroad suppliers are aware of these 'chat' groups and monitor them. It would serve no purpose to mention the offenders by name. The regular group readers very well know who they are! The individuals also know who they are but they need to know that their actions are NOT helping anything! We all want to get better models and to do that we need much better, timely communication between modelers and manufacturers. It might be a good idea if more modelers become familiar with manufacturing processes before they make assumptions. [e.g. Clear flush fitting window glass in a model can cost as much as the body shell itself.] Meanwhile, the team that produced the Bowser San Francisco PCC encountered many knowledgeable modelers that assisted the Bowser team with information that helped with the HO scale PCC car projects. George Huckaby, a member of the Custom Traxx/Bowser team that was responsible for the San Francisco F-line PCC cars, told us that they discovered many more modelers than they anticipated with deep levels of knowledge of vehicles, paint schemes, history and electrical equipment. He told us that it was indeed a pleasure to work with all of them. He also related that the amount of interchange necessary just to acquire the correct colors for the paint scheme for a future Cleveland PCC was intense and that without the support of modelers such as Rich Allman, Bob Dietrich, Charles Long and Richard Vible of the East Penn Traction Club (EPTC), Dave Garcia, and George Jones of the Southern California Traction Club (SCTC) and other knowledgeable trolley fans such as Thomas Bailey and Bob Kutella, many projects would not have been as successful as they had been. Lee English, Bowser CEO and member of the same team, has been quoted as never having seen a San Francisco F-line PCC car. He depended on others to provide the correct details. Such levels of knowledge could and should easily be made available to other modelers and manufacturers. But, there is a real danger it may not be if persons attempting to share information are met with rude, obnoxious and sometimes childish responses. Group moderators must stamp out this type of activity and, they must not be guilty of it themselves. Right now there is a flame of interest in traction modeling burning now in the model railroad industry. Let's not prematurely extinguish it with bad behavior. Most people take up hobbies for enjoyment and the camaraderie that comes with it. None of us should try and spoil it for others with just plain stupid actions. The bottom line is that we need better communications between modelers and manufacturers to get more prototypical models. Stopping some of this unfriendly and, in some cases, hostile behavior would sure help! Your responses to this Trolleyville Editorial are welcome! |
San Francisco finally unveils their new Geneva Heritage Streetcar Facility! On Thursday, December 2, 2010, the San Francisco Municipal Transportation Agency (SFMTA), which oversees all surface transportation in San Francisco including the Municipal Railway (Muni), joined its non-profit partner, the Market Street Railway (MSR), to unveil the canopy at Geneva Yard that will shelter the historic streetcars of the popular F-Market streetcar line and the line’s latest addition, President’s Conference Committee streetcar number 1071. This was a "red-letter" day in San Francisco. After over 15 years, the long awaited cover for the heritage streetcars became a reality. After obstacle after obstacle was removed, the facility was finally cleared for occupation and opened for operation. Featured in the ceremony was the first ex-Minneapolis, ex-Newark streetcar, 1071, just returned from Brookville (Pennsylvania) after a complete electrical upgrade, and interestingly painted in its original Minneapolis colors, last worn by the car in 1954. SFMTA Executive Director/CEO Nathaniel Ford, Jr. is shown at the microphone in the next photo, taken during the dedication ceremonies.
Twenty-four heritage cars can now be protected from the elements. First priority for storage will be the canvas roofed cars, such as Muni 130 and 162 and the Milano Peter Witts. But there will still be room for many of the PCCs. On December 20th, Car 1 returned from Brookville after a complete rebuilding. It is shown after being removed from the trailer and set on its trucks.
The Great Train Expo returns to Pomona-Fairplex for Christmas Train Show! The Great Train Expo (GTE) revived a practice that used to be followed by the old, now defunct, Great American Train Show (GATS). GATS used to regularly hold two train shows at the Pomona-Fairplex, Pomona. CA, each November or December. One was a one-day show largely for the many model train show vendors and the other was a two-day show for the general public. Changes in the model train show vendor demographics made the one-day shows obsolete. Then Pomona-Fairplex management made it difficult to have an enjoyable and successful model train show at their facility. But earlier this year, a change in management philosophy made it possible for the GTE to return to Fairplex and they held a fine show there in July 2010. As you can surmise, the Pomona-Fairplex staff for the most part made the event as smooth as they could despite an almost continuous rainfall that lasted the entire three days of the show from set-up to tear-own. Trolleyville was at this show. The display is shown in the next photo. The pre-production samples of the next line of Bowser trolleys along with the last six of the San Francisco F-Line PCC cars were shown.
In the next scene, SEPTA 2168 and LAMTA 3165, both pre-production cars are being operated on the Custom Traxx display layout. Both cars are equipped with new trolley poles fabricated in China and they are really fine. The production cars should be available by February 2011.
Of course no trip to Fairplex is complete without a trip to the award winning concession stand run by R's N R's. We mentioned them in our July 2010 edition. We normally avoid both convention center and fairgrounds food concessions as they are often overpriced while the food is not that great. This one is a welcome exception. Even in the pouring rain, people were lined up for the food and great service. We lined up again this time for our breakfast sandwiches. If you need some refreshments when you are at Pomona-Fairplex, do not miss it. (Look for the Awards plaques in the front windows.) There was a small problem with communicating where trailers were to be parked and a few other items but Bill Grove, who has been running train shows over half of his life and earned his Master of Train Show Management (MTSM) from DSU*, proactively solved these problems and notified all participants. Guess what Guys...on-site vendor parking for next show at Pomona...a first ever! *Dave Swanson University, a small little known very private training school for train show managers. Students are individually identified and selected for this school by Dean Swanson. The Hollywood Foundry proudly proclaims the company has The Worlds Largest Selection of Model Rail Drive Systems. This is no idle boast! Since the introduction of the ubiquitous BullAnt in 2005, owner Geoff Baxter – a country gentleman with deep Australian roots – has been steadily adding more model rail drives to his product line.
Where to begin? The Diablo comes as a photo etched brass kit, so assembly is required. But the only tools you need are a small #00 Phillips screwdriver, some files, photo etch shears or heavy duty box cutter and smooth jawed needle nose pliers. No soldering! Hollywood Foundry provides all the bits and comprehensive assembly instructions. I was able to assemble one in no time at all using only a photo as a reference (I had the privilege of testing a Diablo before their official release), it is that easy. 1. It is quiet! I ran a Suydam Pacific Electric PCC using two (yes, two) Diablos and it was the quietest two truck drive bar none. Thats a Mashima 1628 motor, by the way. The PCC ran at a scale 21 mph at 7 volts and 37.5 mph at 10 volts. Hollywood Foundry didnt mess around with the Diablos construction; the pulley shafts are fitted with thrust washers and ball races, the wheel axles are fitted with brass bearings, the worm is steel and almost everything else is machined brass, etched brass or nickel silver. In short, the Diablo is meant to last a lifetime.  2. The Diablo is adjustable. Thats right, you can actually raise the Diablo to give your model the proper sill to rail clearance. By using small washers supplied with the kit, I was able to raise the Diablo (and thus lower the floor) to bring the PCC to the proper railhead to sill bottom height. 3. The belt is replaceable. In the unlikely event the belt should break, it is very easy to replace the belt with the extra belt supplied in the kit. If youve ever tried to replace a spring belt, youll appreciate this feature. The belt is made from neoprene rubber, the same material used for car engine belts. If stored and handled properly it should last almost forever. 4. Another innovative feature of the Diablo is that the top pulley has been divorced from the motor. This means the motor can now be placed almost anywhere on the floor and the supplied silicone tubing makes connecting the motor to the Diablo childs play. It also means there is no stress placed on the motors shaft by spring belts pulling down on the pulley. The motor comes attached to a mounting plate with 3M VHB tape which helps reduce vibration. Although the mounting plate can be secured to a floor with supplied screws, I chose to secure the motor to the floor with the same tape; no holes to drill and no worries about the underbody detail being in the way 5. The Diablo laughed at six radius curves. I ran my Suydam PE PCC
curves of the Southern California Traction Clubs test track at a crawl and at full throttle and the Diablos handled the curves without breaking a sweat, probably because the Diablos are designed to take curves down to 5 ½ inch radius. The 60 Lightning is shown in the next photo: 
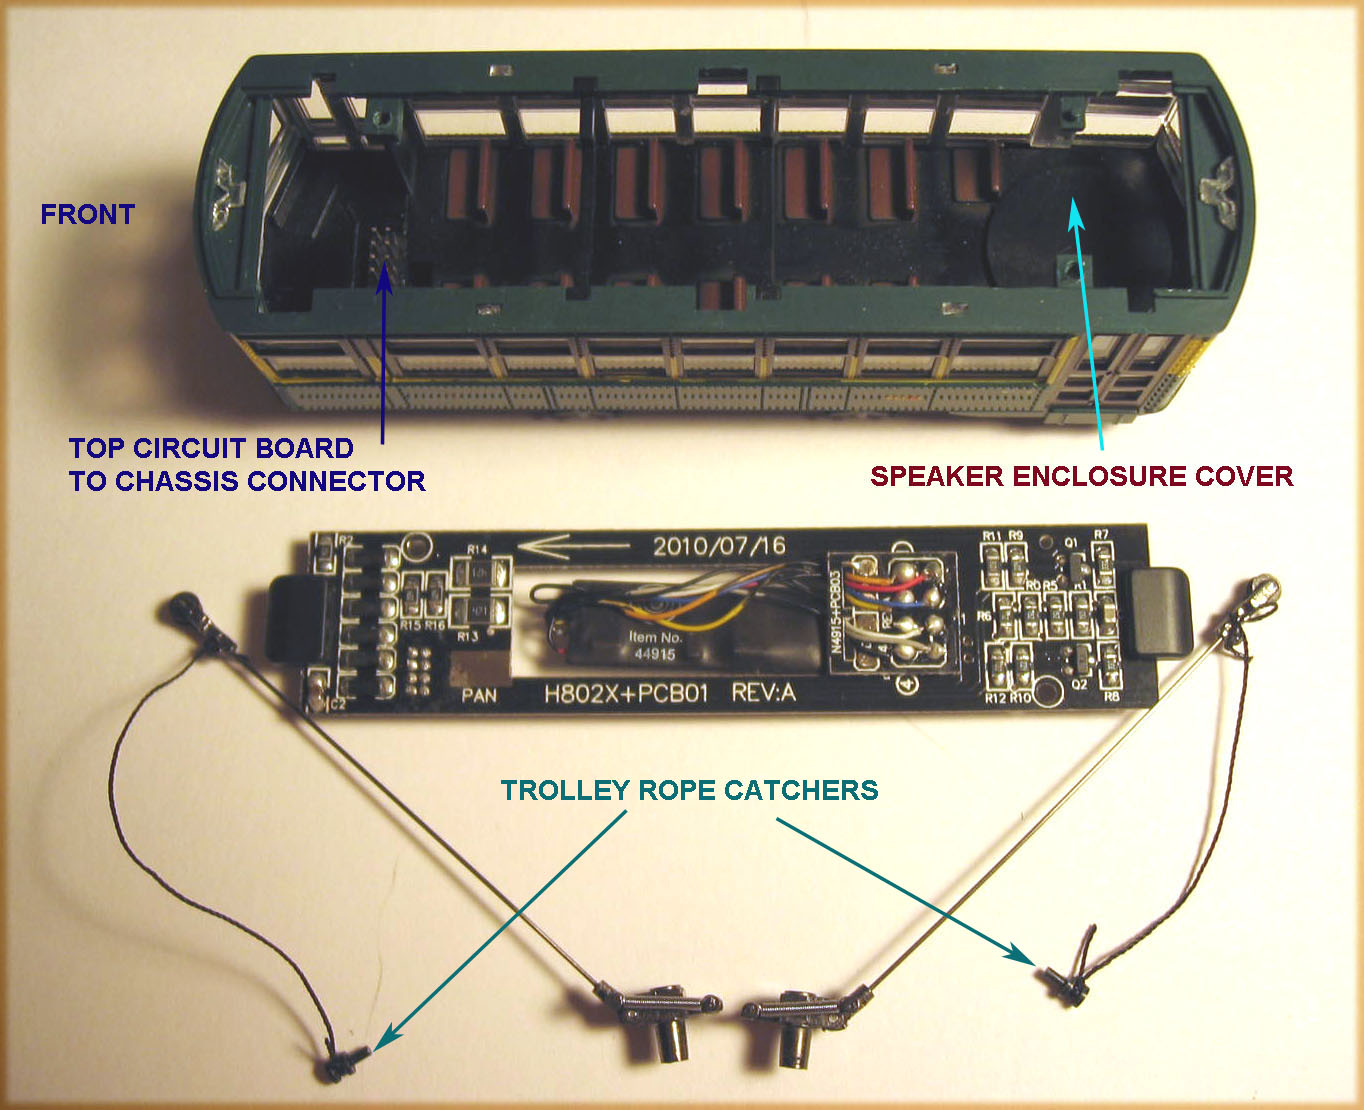
Like the Diablo, it is made out of etched brass and is height adjustable. The wheels have pointed axles spinning in a cone shaped axle bearing as opposed to the side frame itself. These axle bearings are why the truck is called the Lightning; it rolls ultra fast!! The Diablo is the drive we have all been waiting for. With its wide range of wheelbases and wheel sizes, ease of assembly and installation, not only can you now give your models the drive train they deserve, you can also give your unpowered models the drive train they were meant to have! P. S. Last month, Custom Traxx received a Diablo and Lighting with 5' 6" wheelbase and 26" wheels for evaluation. It is slated for installation on a Miniatures by Eric model of a San Francisco ex-Milan Peter Witt streetcar. Both kits are packaged in zip bags and contain detailed instructions with state-of-the art illustrations. The six pages of excellent well-detailed instructions for the Diablo and the three pages of similar high quality instructions for the Lightning leave little room for error by the modeler. Hollywood Foundry even provides an instruction sheet for the Mashima motor and flywheel provided with the Diablo. When we complete assembly of our kits, the results of this will be reported in a future issue. ________________________________________________ [Birney, from column 1] When button 10/0 was activated, the front headlight and both red rear lights came on and when the throttle was turned, the car moved forward. In reverse, the rear headlight illuminated and the both red front lights came on. Neither headlight fully extinguished when it should, it just dimmed. The interior lights are activated with button F10/0 along with the headlights so they are incapable of individual control. Naturally, due to the fixed mounting of the trolley poles to the roof and the other reasons discussed throughout this report, we could not live with the trolley poles on this car. All poles used on the Southern California Traction Club must be removable without disassembling the car. So we attempted to remove the roof using the drawing supplied. This is not an easy task. The roof attachment method is similar to that used on the Peter Witt but the car is smaller and application of precise pressure points are needed to remove the roof. It also helps if you have smaller hands. What we saw when we removed the roof, we liked. The methods of providing power from trolley poles on an HO streetcar has had to be totally rethought in the DCC era. We have to deal with a circuit board and a decoder in a car that has many windows. Plus we still have that weight problem if we want to climb grades or operate from overhead wire. In all cases so far, (e.g. Bowser, Con-Cor & Bachmann) the circuit board is in the roof area but still attached to the chassis in one way or another. Some engineering ingenuity must be used to get power from trolley poles when the roof must be removable to install or remove decoders. The method used by Bachmann on this car is the best seen to date. In Figure 5 below, the Trolley Pole Power Strip (green arrows) used to transfer power from the Trolley Pole Bases (red arrows) to the Pan Power Pad (orange arrows) on the circuit board is clearly shown.
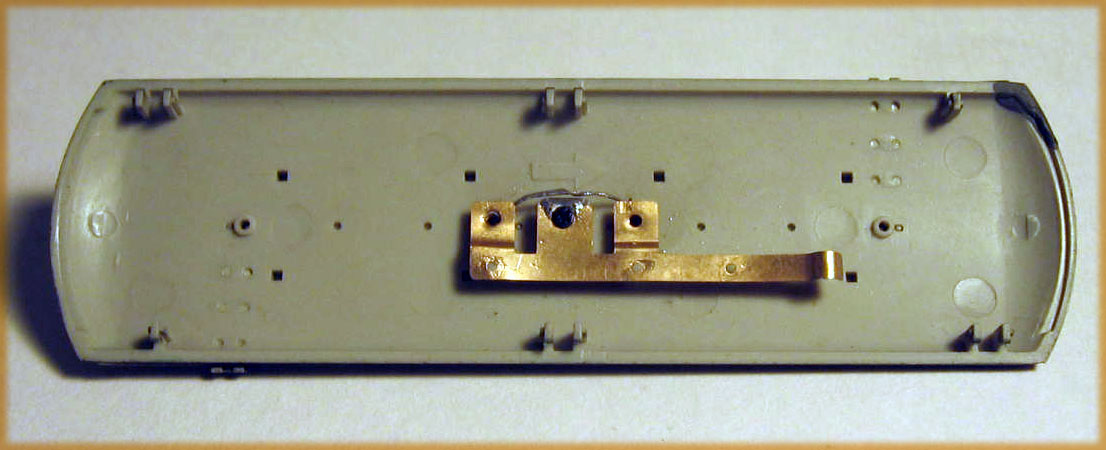
This makes it necessary to ensure that you do not break the tabs that hold the roof to the body shell. It is that snap connection that ensures a positive contact between the Trolley Pole Power Strip and the Pan Power Pad. Also note the location of the actual connectors so you will press on the correct locations when removing the body. The drawing provided by Bachmann does not seem to indicate the best location to provide pressure to remove the roof. The use of the Trolley Pole Power Strip affixed to the underside of the roof makes is easy for a modeler to fabricate a brass platform and connect it electrically to this Trolley Pole Power Strip, taking full advantage of the plastic non-conductive roof for powering the poles. Bachmann has also provided an opening in the top circuit board about .425" by 1.39" in which to place their decoder or another decoder of the modeler's choice. There are two stops under the board to prevent the decoder from dropping into the interior. Unfortunately, the cap covering the location for a speaker had become dislodged forcing us to remove the top circuit board to reattach or remove it. You can see a portion of this loose cover in the lower portion of the first window behind the front door in Figure 1. The floor is almost at the same level as the seat bottoms so any figures placed in this car will have to have the legs removed. The provided location for a speaker is shown in Figure 6.
So we had to remove the top circuit board which is held to the body shell by two screws. Carefully lifting the board allowed it to unplug itself from the 8-pin plug that connects it electrically to the chassis. We also removed the trolley poles from the roof and at the same time pulled the trolley catchers from the ends.
We decided to install our SCTC1 trolley pole pivots along with two Miniatures by Eric trolley poles. The SCTC1 pivots from Custom Traxx are approximately .375" long. They were that length due to the thick roofs of resin shelled traction bodies. The original 1970s-era brass pivots from Fairfield Traction Models, upon which the SCTC1 pivot was based, are only .200" in length. As was the case with the Bachmann Peter Witt, these older, shorter pivots are just perfect. The holes in the roof were larger so we used .125" lengths of shrink tubing over our older pivots and cemented this assembly into the roof with ACC. This left the bottom of the pivot free to contact the Trolley Pole Power Strip. Of course, one could always shorten two of the longer ones. Once we drilled holes in the trolley pole power strip to clear the 1.0 mm trolley pole pin base, we were ready for installing our replacement poles and begin testing in the overhead wire mode. Figures 8 and 9 show the installation of the trolley pole pivots from both sides of the roof.
We decided to use the HT-P2 poles from Miniatures by Eric. These poles are slightly long for the PTC Birney. So we removed about two feet from each pole and replaced the trolley shoes with HT-C3 trolley wheels. Trolley shoes were not used in Philadelphia until 1975 and the Birneys were gone by 1948. After looking at photos of the prototype, we fashioned new, higher trolley pole hooks from some brass bar stock and fastened them to the roof with ACC. We will eventually pin them to the roof. While we had the roof removed from the body, we airbrushed the entire roof with Floquil 110012/F12, Reefer Gray, which we think is closer to the actual roof color of the PTC 1-5 series Birney cars. After completing all of our planned modifications, which included replacing the trolley poles with Miniatures by Eric HT-P2 poles, replacing the destination signs with decals, installing our trolley pole pivots, fabricating and installing some longer trolley pole hooks, replacing the trolley shoes with trolley wheels and replacing the stock pole catchers with some La Belle castings that we had in our parts box, we reassembled our car and prepared the car for testing. NOTE 1 on the last page of the instructions supplied with the Bachmann Birney states: "...We recommend that you run the locomotive in each direction, at either three quarter or half speed about two to three minutes to help to run it in for better performance..." We did that and noted the better performance of the car. We remain concerned about NOTE 2 on the last page of the instructions : "...A thermal fuse is installed on this locomotive, to protect the PCB (w/decoder) when the motor is over-load or over-heat. Once the motor current is over 250mA the thermal fuse will cut off the power that is supply to the motor. If the thermal fuse works, the locomotive will stop during operation. Please take away the locomotive from the track and wait for a minute until the motor cool down before operate the locomotive again..." There is a small motor in this car. We are concerned that this thermal fuse could pose a problem during the extended running that could occur during normal club appearances. Testing continues. If this turns out to be a problem, we will report it in a future edition. Meanwhile, the car seems to run great. This is a really great model with prototypical dimensions. The items mentioned in this report do not seriously detract from it. Most of our comments involve the installation and replacement of the trolley poles, which are too long and have bulky trolley wheels and yokes. If Bachmann insists on supplying trolley ropes, they should be no longer than necessary when both poles are stowed. Most operators of these streetcars will not be using overhead wire and if they do, these ropes have to go. The destination and dash signs, if a problem to any modeler, are easily corrected with the Custom Traxx CT-6000 wheel set. We did just that and the results can be seen in Figure 10. Compare the destination sign with that shown in Figure 2.
The final test was running the car on the Southern California Traction Club (SCTC) test track. On the day after Christmas, we took it to the SCTC test track for operational testing in the overhead wire mode. The car performed as expected. The car had no trouble with the 9" and 6" radius curves of the test track. We ran the car in both the two-rail and overhead wire modes and it ran very well. Unfortunately, when in the overhead wire mode, the car only picks up current from two of the four wheels. It seems that only Bowser understands the practicality of all-wheel pick-up in the overhead wire mode. In the next three photos, the car is undergoing its final testing on the SCTC test track.
The next two photos in Figure 12 show the front and rear end of the car while being test run. The red tail lights on the rear are a very nice touch.
After some running on the test track, we experienced some erratic operation when using the front pole. Because we were concerned that repeated removal of the roof could result in the breakage of the small latches that secure the roof to the body shell, we wanted a solution that would reduce the requirement for further removals of the roof. So we elected to solder a small length of tinned stranded wire to both Trolley Pole Pivots and the Trolley Pole Power Strip as shown in Figure 10 below:
Our problems then vanished and the car ran perfectly after that. This car is such a great complement to the Ready-To-Run trolleys previously released by Bowser, Con-Cor and Bachmann themselves. Custom Traxx is working with Train Control Systems to develop an M1T-SH decoder for this car. Cstom Traxx would not even be involved in DCC if it were not for Bob Santelli, formerly of Allied Model Trains and John Forsythe of Train Control Systems. Bob passed away in 2008 and Custom Traxx told us that they miss him very much. This new TCS decoder will have the F6 auto start/stop feature, and provide the same directional front and rear lighting. TCS provided the first test decoder on December 30th and evaluation began immediately. The next photo shows the car with the test TCS decoder installed. The test decoder has much longer wires than the production version will. The Bachmann decoder is in the lower left portion of the photo and the modified roof is in the top of the same photo.
When the test decoder was installed and the car operated on the test track, button 6 operated just as it did on the M4T decoder in the Bowser PCC cars. The car slowed gradually to a realistic stop. When button 6 was again pressed, the car gradually resumed the previous speed. At no time was the throttle or throttle setting changed. Unfortunately, we lost control of the interior lights and could not activate them. To regain control of these lights would probably require a three function decoder. So, at this time we have to trade the interior lights for the button 6 auto start/stop function. There were so many operators of single truck Birney cars (34 in Pennsylvania alone) that Bachmann could never be able to provide models of even 25% of them. This is why we urge Bachmann to make a few undecorated models of this car available. We can just picture a pair of single pole Birneys, painted Electric Lines Red and lettered for Pacific Electric. How about Colorado Springs, Los Angeles Railway and San Diego? Mr. BACH-MAN! How about it? |
|
Trolleyville
| Factory
| Trolleyville Times | Info
Center/Real Estate Office | School
| Library
| Clubhouse
| Downtown |

.gif)
